Set Up Amazon S3 for Clearbay: IAM Policy, Costs, Lifecycle
Create a private S3 bucket and a least-privilege IAM key for Clearbay, clean up interrupted uploads, and compare S3 storage class costs for Mac archives.
 By Clearbay TeamGuides from the people building Clearbay

To set up Amazon S3 for Clearbay, you create a private S3 bucket, an IAM user whose policy only reaches that bucket's clearbay/ folder, and an access key for that user. Then you paste the region, bucket name and key into Harbor → Add cloud storage… → Amazon S3 and click Test connection. It takes about ten minutes. This guide also covers the parts most S3 tutorials skip: the exact permissions Clearbay uses (so you grant nothing extra), a lifecycle rule that cleans up interrupted uploads, and what a year of Mac archives really costs in each storage class, including the download when you bring files back.
Prices are Amazon's US East (N. Virginia) list prices as of November 2026, taken from the AWS Price List API on 2026-11-14.
What you need before you start
- An AWS account, signed in as someone who can create IAM users and policies.
- Clearbay on a Mac running macOS 14 Sonoma or later (Apple silicon or Intel), free from clearbay.app/download. Adding a bucket and testing the connection is free; offloading items to cloud storage is part of Pro.
- A rough idea of how much you'll store; read the cost section before picking a storage class.
If you have a spare USB or Thunderbolt drive, offloading to an external drive is simpler and has no monthly bill. Cloud storage wins when you want the copy off-site.
Step 1: Set up Amazon S3 with a private bucket
- In the AWS console, open S3 → Buckets → Create bucket. Keep Bucket type on General purpose.
- Pick the AWS Region closest to you, for example
us-east-1,eu-west-2orap-southeast-2. Write it down: Clearbay signs every request for that region. - Choose a Bucket name with lowercase letters, digits and hyphens only, such as
clearbay-jane-mbp. Avoid dots. Clearbay talks to S3 atbucket.s3.<region>.amazonaws.com, and a dot in the bucket name breaks the HTTPS certificate match for that address. - Object Ownership: leave ACLs disabled (recommended).
- Block Public Access settings for this bucket: keep Block all public access ticked. Clearbay never needs public access.
- Bucket Versioning: leave it Disabled. With versioning on, deleted cloud copies keep billing as old versions.
- Default encryption: keep Server-side encryption with Amazon S3 managed keys (SSE-S3). With SSE-KMS instead, the user would also need
kms:GenerateDataKeyandkms:Decrypt. - Under Advanced settings, leave Object Lock disabled, then click Create bucket.
Several Macs can share one bucket: Clearbay stores everything under clearbay/<this-Mac's-id>/.
Step 2: Write a least-privilege IAM policy for Clearbay
Skip the usual s3:* wildcard. We listed every request Clearbay's S3 client sends: ten request types, mapping to six IAM actions:
| When Clearbay… | S3 request | IAM action |
|---|---|---|
| Tests the connection | PutObject, HeadObject, DeleteObject on a tiny probe file | s3:PutObject, s3:GetObject, s3:DeleteObject |
| Uploads a small item (one part) | PutObject | s3:PutObject |
| Uploads a large item | CreateMultipartUpload, UploadPart, CompleteMultipartUpload | s3:PutObject |
| Checks every part before finishing | ListParts | s3:ListMultipartUploadParts |
| Cleans up a failed upload | AbortMultipartUpload | s3:AbortMultipartUpload |
| Verifies size and metadata, restores | HeadObject, ranged GetObject | s3:GetObject |
| Deletes a cloud copy | DeleteObject (archive + manifest) | s3:DeleteObject |
| Shows how much is stored | ListObjectsV2 with prefix clearbay/ | s3:ListBucket |
Clearbay never creates, configures or lists buckets, so this policy is all it needs. It limits object access and listing to the clearbay/ folder. Replace BUCKET with your bucket name:
{
  "Version": "2012-10-17",
  "Statement": [
    {
      "Sid": "ListOnlyTheClearbayFolder",
      "Effect": "Allow",
      "Action": "s3:ListBucket",
      "Resource": "arn:aws:s3:::BUCKET",
      "Condition": { "StringLike": { "s3:prefix": ["clearbay/*"] } }
    },
    {
      "Sid": "ObjectsUnderClearbayOnly",
      "Effect": "Allow",
      "Action": [
        "s3:PutObject",
        "s3:GetObject",
        "s3:DeleteObject",
        "s3:AbortMultipartUpload",
        "s3:ListMultipartUploadParts"
      ],
      "Resource": "arn:aws:s3:::BUCKET/clearbay/*"
    }
  ]
}
AWS's multipart documentation says the person who starts an upload can list and abort its parts by default. Naming those two actions anyway makes the policy self-explanatory and still works if a later bucket policy tightens things. You can't remove s3:DeleteObject to make the key "append only": Test connection deletes its probe file, and Clearbay deletes a cloud copy when you ask it to.
Step 3: Create an IAM user and an access key
- Open IAM → Users → Create user. Name it something you'll recognize, such as
clearbay-jane-mbp. Leave Provide user access to the AWS Management Console unticked; this user only needs an API key. - On Set permissions, choose Attach policies directly → Create policy. A new tab opens. Switch the editor to JSON, paste the policy from Step 2, click Next, name it
clearbay-one-bucketand click Create policy. - Back on the first tab, click the refresh button, search for
clearbay-one-bucket, tick it and finish with Create user. - Open the new user, go to Security credentials → Access keys → Create access key, choose Application running outside AWS, and click through.
- Copy the Access key ID and Secret access key, or click Download .csv file. AWS shows the secret only once. If you lose it, delete the key and create a new one.
AWS will suggest alternatives to long-term access keys; those need software that refreshes temporary credentials, and Clearbay uses a standard key pair. The tight policy keeps that key low-risk: even if it leaked, it could only touch BUCKET/clearbay/.
Step 4: Connect the bucket in Clearbay
- Open Clearbay and go to Harbor. Click Add cloud storage….
- Choose Amazon S3 as the provider and fill in the fields below.
- Click Test connection. Clearbay writes a tiny probe file under
clearbay/, reads its size back and deletes it. When it says "Connected. Clearbay can write, read and delete in this bucket.", click Save. - If you want new cloud offloads to go here by default, tick Offload here from now on.
| Clearbay field | What to paste |
|---|---|
| Region | The bucket's region, for example eu-west-2. Leave it empty for us-east-1. |
| Bucket | The bucket name. Capitals are lowercased automatically, because S3 bucket names are lowercase. |
| Access key ID | The IAM user's access key ID (starts with AKIA). |
| Secret access key | The secret from Step 3. Clearbay saves it in your Mac's Keychain only, for this device only. It is never written to a settings file. |
The sheet shows where your items will live, for example "Items are stored under clearbay-jane-mbp/clearbay/…". Clearbay also strips invisible characters that sneak in when you paste from a web page, a common cause of signature errors in other tools.
Step 5: Add a lifecycle rule for interrupted uploads
A large item goes up as a multipart upload. If your Mac sleeps, loses Wi-Fi for too long or crashes mid-upload, Clearbay can't resume it yet. When Clearbay itself stops an upload, it aborts it and nothing is left behind. After a crash, though, the parts already sent stay in the bucket. They're invisible in the console's object list, and AWS states that you're billed for their storage until the upload is completed or stopped. A lifecycle rule stops them automatically:
- Open the bucket → Management → Lifecycle rules → Create lifecycle rule.
- Name it
abort-incomplete-uploads. Under Choose a rule scope, either limit it with the prefixclearbay/or apply it to all objects. - Under Lifecycle rule actions, tick Delete expired object delete markers or incomplete multipart uploads, then Delete incomplete multipart uploads, and enter 3 days.
- Click Create rule.
The same rule as JSON, for aws s3api put-bucket-lifecycle-configuration --bucket BUCKET --lifecycle-configuration file://rules.json:
{
  "Rules": [
    {
      "ID": "abort-incomplete-uploads",
      "Filter": { "Prefix": "clearbay/" },
      "Status": "Enabled",
      "AbortIncompleteMultipartUpload": { "DaysAfterInitiation": 3 }
    }
  ]
}
Why three days and not one? The rule counts from the moment the upload started, not from the last part, so it must never fire while an upload is still running. Clearbay accepts items up to 200 GB. Here is how long one item takes at common upload speeds (simple math: size × 8 ÷ speed):
| Item size | 20 Mbit/s up | 50 Mbit/s up | 100 Mbit/s up | 500 Mbit/s up |
|---|---|---|---|---|
| 10 GB | 1.1 hours | 27 minutes | 13 minutes | 3 minutes |
| 100 GB | 11.1 hours | 4.4 hours | 2.2 hours | 27 minutes |
| 200 GB | 22.2 hours | 8.9 hours | 4.4 hours | 53 minutes |
On a 20 Mbit/s uplink, a 200 GB item takes almost a day, so a one-day rule could cut it off. Clearbay's part check would then fail before anything was deleted from your Mac, but the upload would be wasted. Three days covers every case above.
What Amazon S3 costs for Mac archives, by storage class
Clearbay uploads into your bucket's default storage class, which is S3 Standard. You can't choose a class in the app, but a lifecycle rule can move objects to a cheaper class after upload. We priced a realistic year: you upload 100 GB or 1 TB of Mac files as 10 GB items, keep them for 12 months, then restore everything once. The numbers include storage, every request Clearbay sends (counted from its code: 601 write requests and 598 reads per 10 GB item), retrieval fees and internet egress.
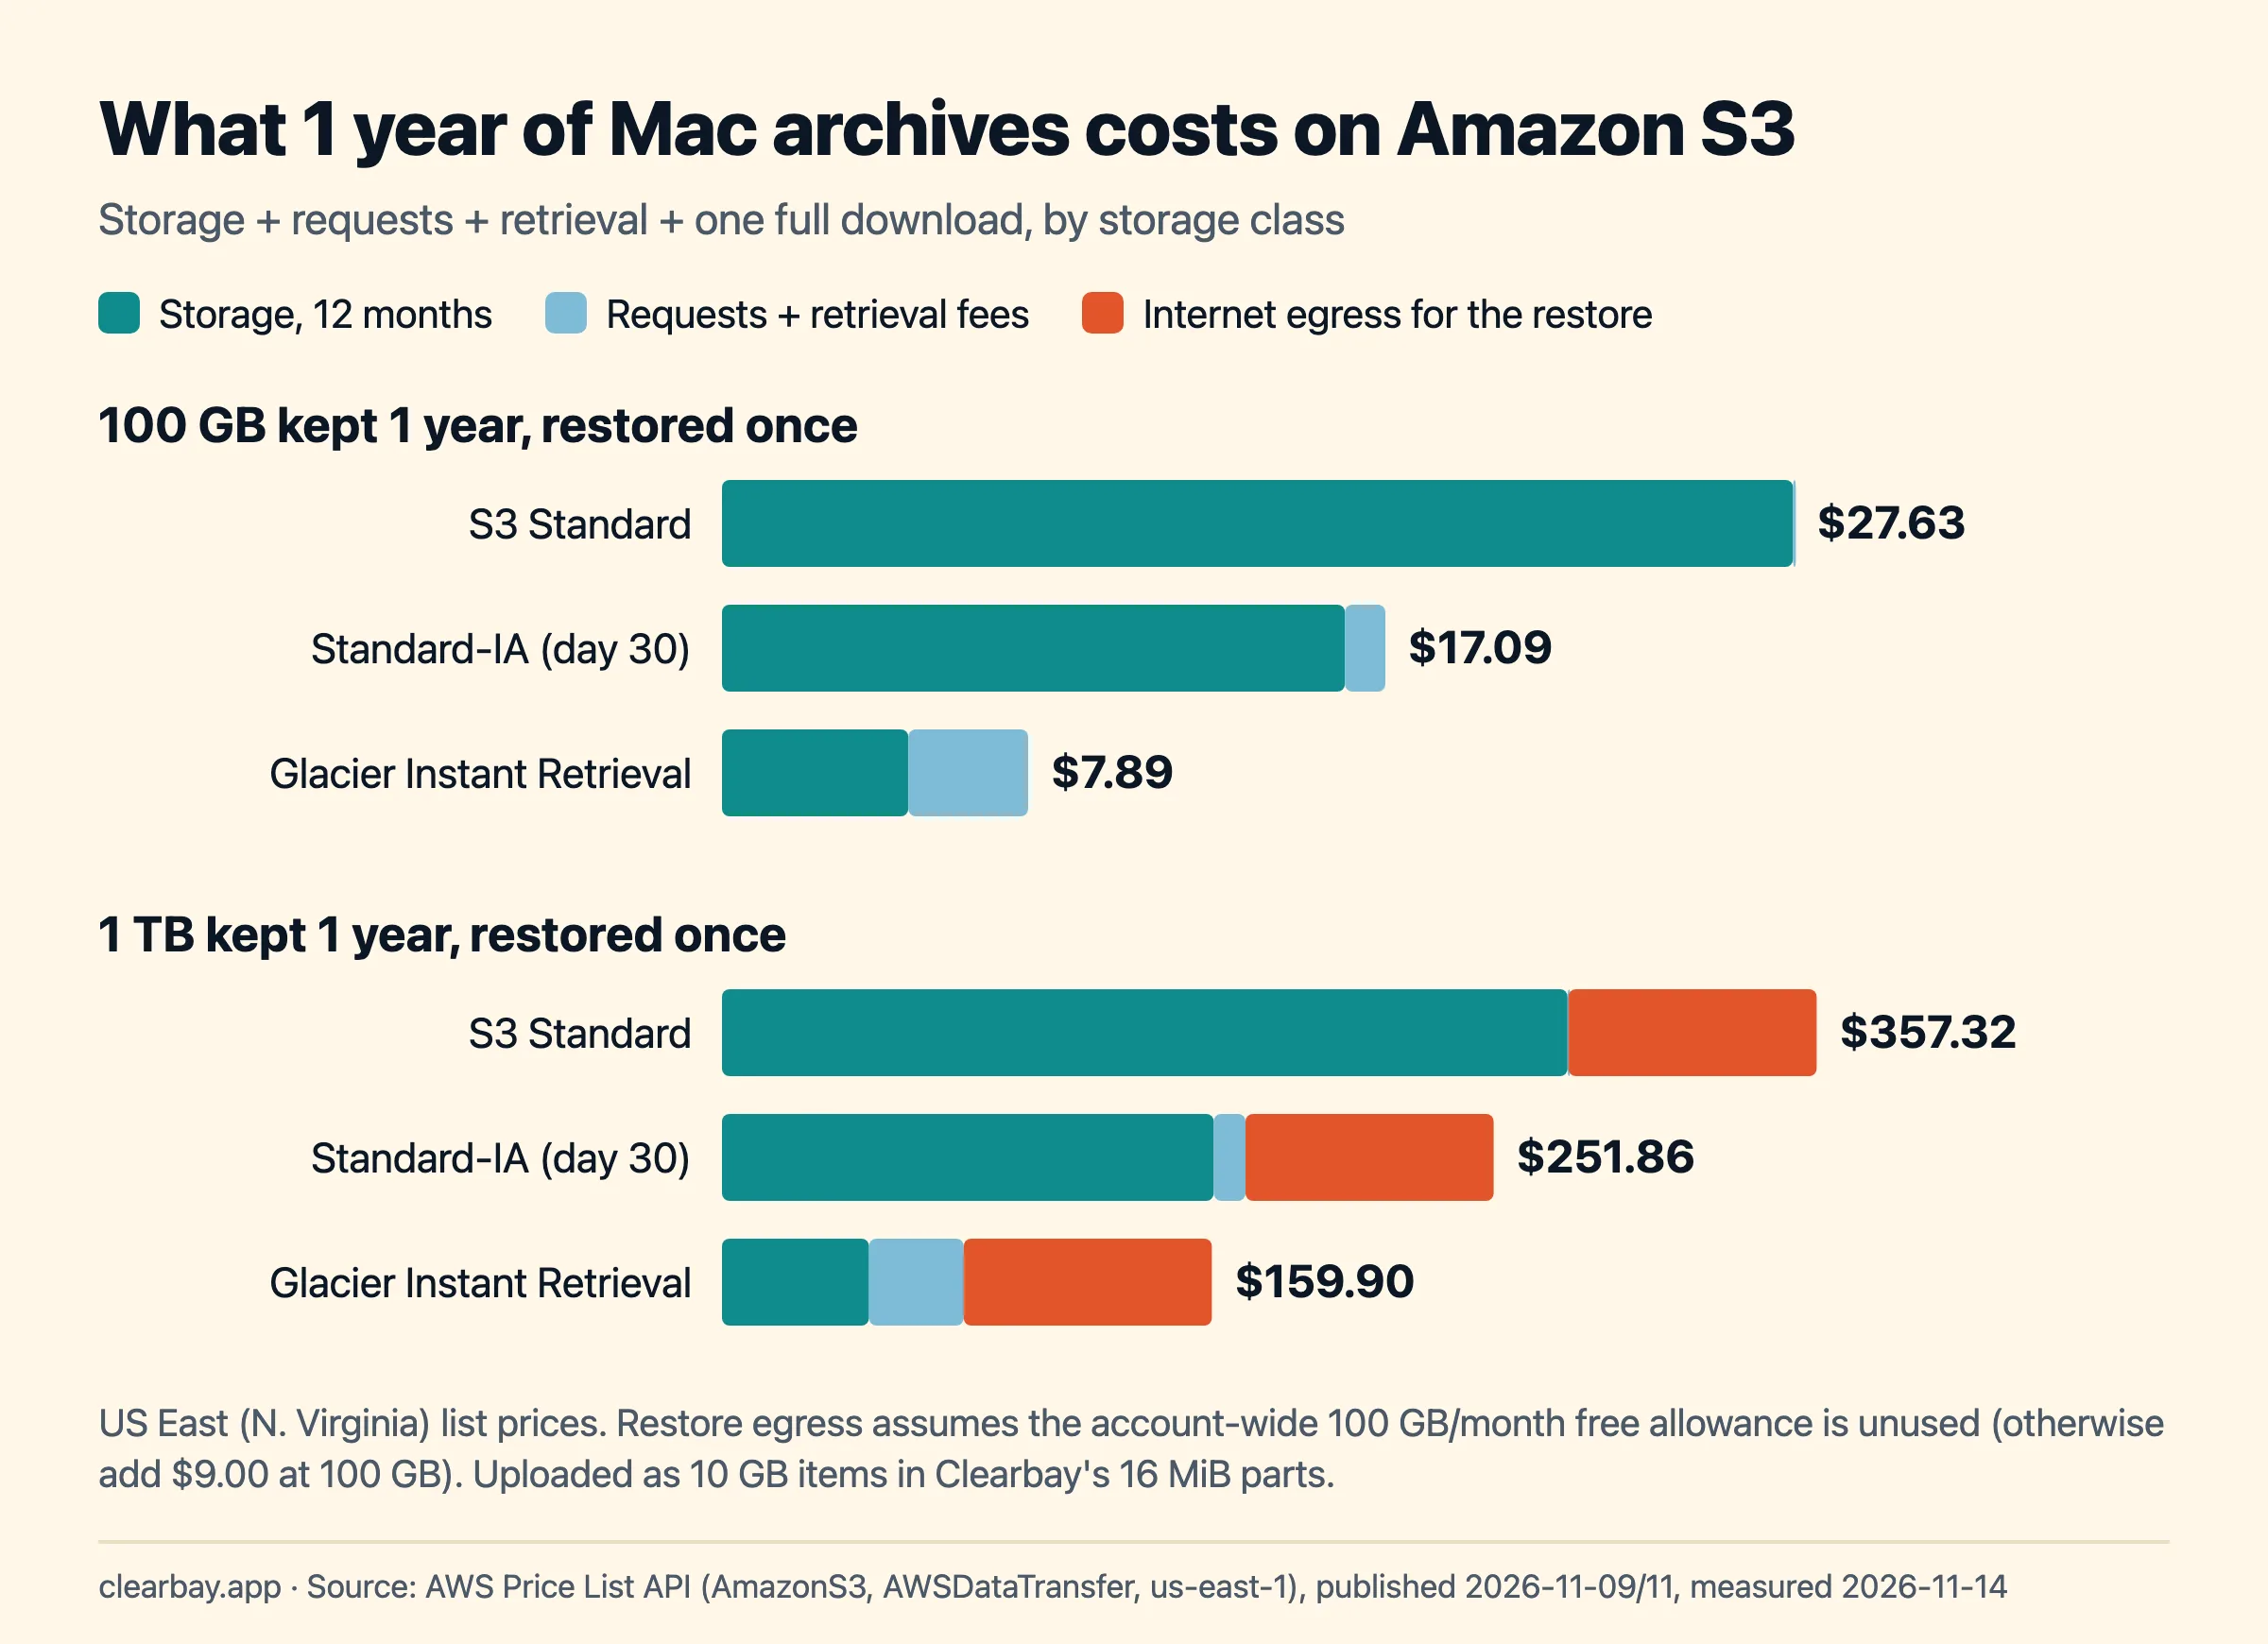
| Storage class (how) | Storage price | Retrieval fee | Minimum duration | 100 GB, 1 year + restore | 1 TB, 1 year + restore |
|---|---|---|---|---|---|
| S3 Standard (default) | $0.023/GB-month | none | none | $27.63 | $357.32 |
| Standard-IA (lifecycle, day 30) | $0.0125/GB-month | $0.01/GB | 30 days | $17.09 | $251.86 |
| Glacier Instant Retrieval (lifecycle, day 0) | $0.004/GB-month | $0.03/GB | 90 days | $7.89 | $159.90 |
What the numbers show:
- Egress is the hidden line item. Internet data transfer out costs $0.09/GB for the first 10 TB a month, after a free 100 GB per month shared across your whole AWS account. Restoring 1 TB once costs $81 in egress alone, more than a full year of Glacier Instant Retrieval storage. At 100 GB the free allowance covers the restore, but only if nothing else in your account used it that month; otherwise add $9.
- Requests are noise. Uploading 1 TB in 16 MiB parts costs about $0.30 in requests; reading it back from Glacier Instant Retrieval adds $0.60.
- Glacier Instant Retrieval is the best S3 class for offloaded files you expect to leave alone for at least three months. It's the cheapest class that still answers a normal GET request, so Clearbay restores from it exactly as from Standard. Deleting an object before 90 days are up costs the rest of those 90 days.
- Standard-IA only fits if you restore often, and S3 won't move objects there before day 30.
To move offloads into Glacier Instant Retrieval, add a second lifecycle rule: Transition current versions of objects between storage classes → Glacier Instant Retrieval → 0 days after object creation. As JSON, add this to the Rules array:
{
  "ID": "clearbay-to-glacier-ir",
  "Filter": { "Prefix": "clearbay/" },
  "Status": "Enabled",
  "Transitions": [ { "Days": 0, "StorageClass": "GLACIER_IR" } ]
}
Since September 2024, S3 lifecycle rules skip objects smaller than 128 KB by default. That suits Clearbay: most of its small JSON manifest files stay in Standard, and the big .tar archives move.
Do not transition to Glacier Flexible Retrieval or Glacier Deep Archive. Objects in those classes can't be read until someone sends a separate restore request and waits hours. Clearbay doesn't send those requests, so a restore would fail. If you're comparing providers, Backblaze B2 and Cloudflare R2 have no egress fee for a restore like this; see B2 setup and R2 setup for the same math.
How Clearbay uploads to S3: the multipart math
Clearbay doesn't copy your folder file by file. It streams the item as one tar archive straight into an S3 multipart upload, so it never writes a temporary archive to your disk, which matters when your disk is nearly full. Three parts upload at once. Parts are 16 MiB by default.
S3 allows at most 10,000 parts per upload, and 16 MiB × 10,000 is about 167.8 GB. Clearbay budgets 9,500 parts, leaving headroom in case files grow while the archive is being built. The exact rule in CloudOffloadEngine.partSize(forEstimatedBytes:) is: divide the estimated archive size by 9,500, and if the result is larger than 16 MiB, round it up to the next whole MiB. The estimate is the item's bytes plus 1,024 bytes for each file and one more for the archive itself.
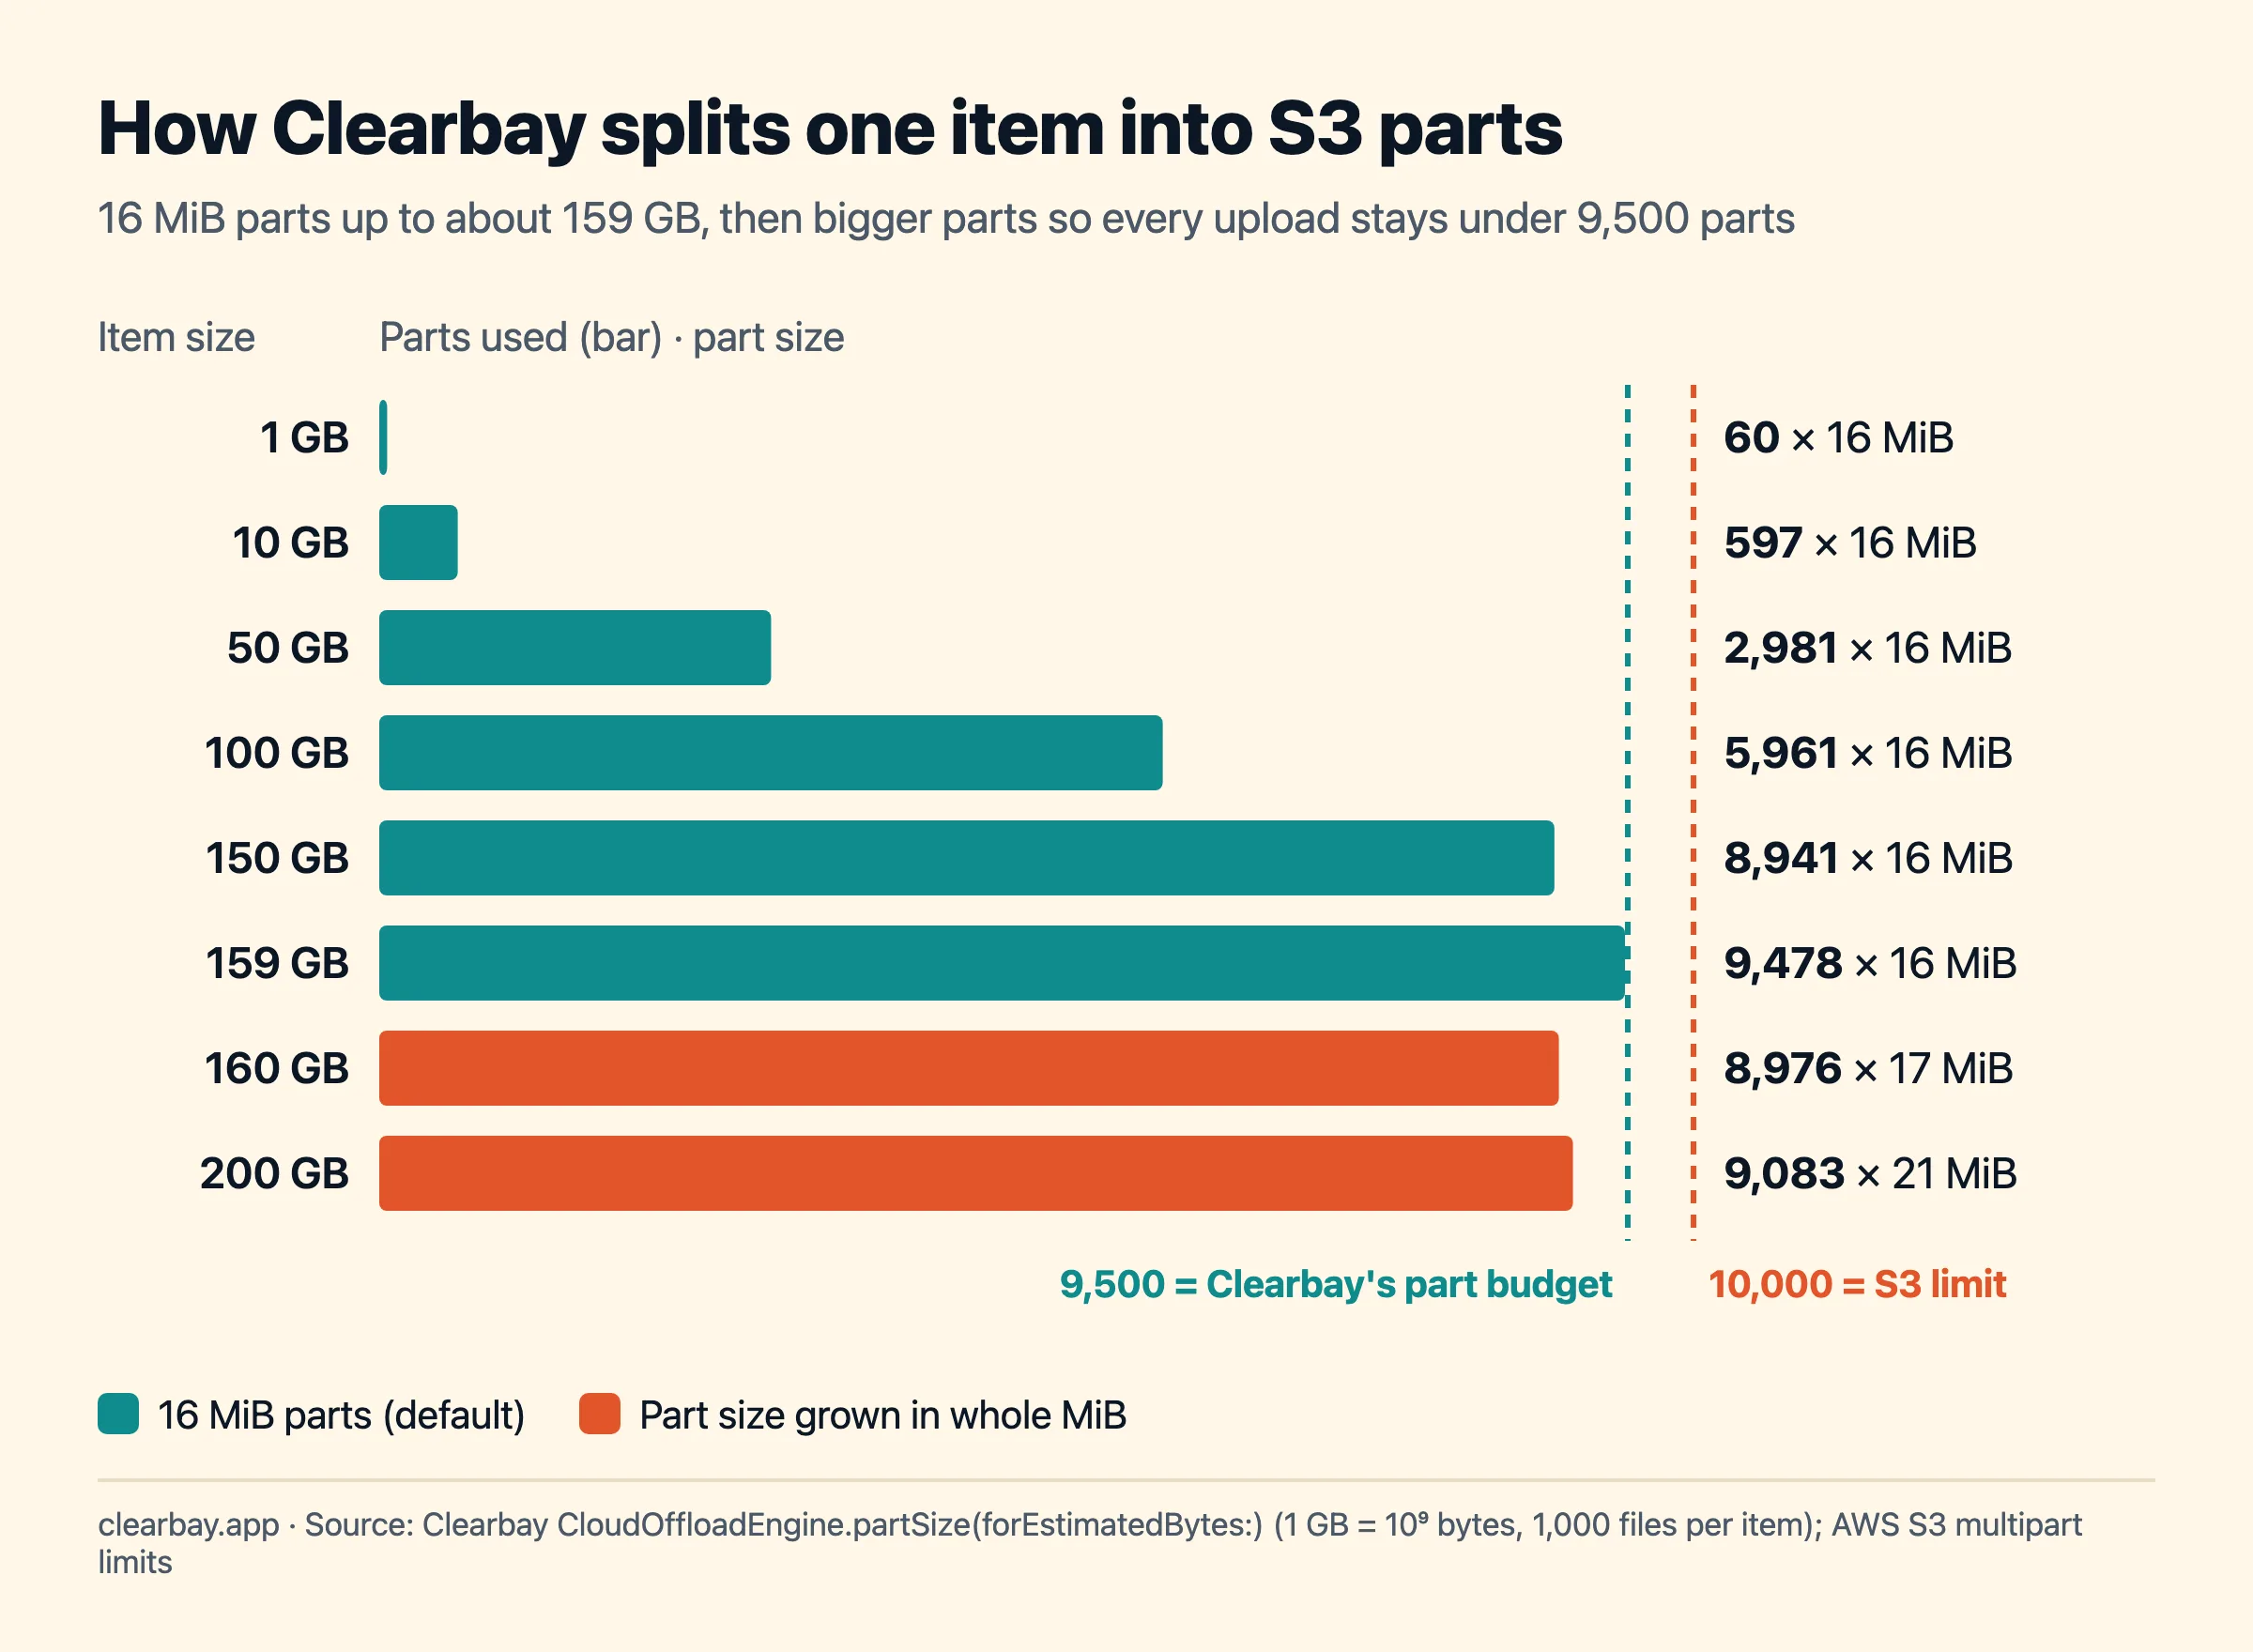
- 16 MiB × 9,500 parts = 159,383,552,000 bytes, so items up to about 159 GB keep 16 MiB parts.
- A 200 GB item, Clearbay's per-item maximum, gets 21 MiB parts and needs 9,083 of them.
- S3's own limits are far higher: parts from 5 MiB to 5 GiB and objects up to 48.8 TiB. Clearbay's 200 GB cap is its own, not Amazon's.
After the last part, Clearbay lists the uploaded parts and checks every part number and size, completes the upload, then reads the object's size and stored byte and file counts back with a HEAD request. Only then does it write the manifest and delete the original from your Mac. If any check fails, the source stays untouched and the partial upload is aborted. Restores download the archive in 16 MiB ranges into a temporary folder and check the SHA-256, file count and byte total before moving it into place.
Troubleshooting Amazon S3 in Clearbay
| Clearbay says | Likely cause | Fix |
|---|---|---|
| The bucket is in region X. Change the region and try again. | The Region field doesn't match the bucket. | Type the region Clearbay names. Empty means us-east-1. |
| The access key ID isn't recognised. | Key copied partly, deleted, or from another account. | Paste the full ID again, or create a new key. |
| The secret key doesn't match the access key. | Wrong or truncated secret. | Paste the secret again. If you no longer have it, make a new key. |
| These keys can't write to this bucket. | Policy missing, attached to another user, or the bucket name in the policy is wrong. | Check that the policy's ARNs use your exact bucket name and end in /clearbay/*. |
| Your Mac's clock is off. | S3 rejects signatures more than a few minutes out. | System Settings → General → Date & Time → turn on Set time and date automatically. |
| The bucket doesn't exist at this endpoint. | Typo in the bucket name. | Copy the name from the S3 console. |
| A restore fails with "The keys were refused (403)" although Test connection works. | The object was moved to Glacier Flexible Retrieval or Deep Archive, which S3 answers with a 403. | Remove that transition rule. In the S3 console, select the object and choose Actions → Initiate restore; once the temporary copy is ready, restore in Clearbay. |
How Clearbay handles S3 offloads
Clearbay is a macOS disk-space app. Its cloud offload is built for files you want off your Mac but not deleted: old projects, finished video exports, installers you might need again. Each item becomes one .tar object plus a small JSON manifest under clearbay/<Mac id>/. Your access key lives only in the Keychain. Offloaded items appear in Harbor under Offloaded items, where View contents lists what's inside the archive without downloading it. Restore brings an item back and keeps the cloud copy by default; Restore & delete from cloud removes it after a verified restore. A restore needs the item's size plus about 500 MB free on your Mac.
Current limits: 200 GB per item, no resume after a crash, and live tool caches that Clearbay rewires (Gradle, Hugging Face and similar) need a local drive; see developer caches on a Mac. Clearbay works with Amazon S3, Cloudflare R2, Backblaze B2, Wasabi, MEGA S4 and other S3-compatible servers. For a wider look at your options, read how to free up space on a Mac without deleting files. You can download Clearbay free and test your bucket before deciding on Pro.
FAQ
Is Amazon S3 good for personal Mac backups?
S3 is very durable and available in many regions, but it's priced for businesses. For a personal archive, Standard costs $0.023 per GB-month, and restoring data over the internet costs $0.09/GB after 100 GB free per month. If you choose S3, move offloads to Glacier Instant Retrieval with a lifecycle rule. That cuts storage to $0.004 per GB-month and still allows instant restores.
How much does it cost to store 1 TB on Amazon S3 for a year?
At US East list prices in November 2026, 1 TB in S3 Standard costs $276 for 12 months. Glacier Instant Retrieval costs $48 and Standard-IA about $160 when objects move there after 30 days. Bringing the full terabyte back once adds $81 in egress, plus a $30 retrieval fee for Glacier Instant Retrieval or $10 for Standard-IA.
Does Amazon S3 charge for downloads?
Yes. Data sent from S3 to the internet is billed as egress: the first 100 GB each month are free across your whole AWS account, then $0.09/GB for the next 10 TB from US East. GET requests cost extra but are tiny, $0.004 per 10,000 in Standard. Infrequent-access and Glacier classes also charge a per-GB retrieval fee.
What's the difference between S3 Standard-IA and Glacier Instant Retrieval?
Both return data instantly with a normal GET, so Clearbay can restore from either. Standard-IA stores data for $0.0125/GB-month with a $0.01/GB retrieval fee and a 30-day minimum. Glacier Instant Retrieval stores for $0.004/GB-month with a $0.03/GB retrieval fee and a 90-day minimum. For files you rarely restore, Glacier Instant Retrieval is cheaper.
Can Clearbay use S3 Glacier Deep Archive?
No. Objects in Glacier Flexible Retrieval or Deep Archive must be restored with a separate request and a wait of hours before anyone can download them. Clearbay reads objects directly and doesn't send restore requests, so restores would fail with a 403 error. Use Glacier Instant Retrieval, the cheapest S3 class that still allows direct reads.
What permissions does an S3 access key need for Clearbay?
Six IAM actions: s3:PutObject, s3:GetObject, s3:DeleteObject, s3:AbortMultipartUpload and s3:ListMultipartUploadParts on arn:aws:s3:::BUCKET/clearbay/*, plus s3:ListBucket on the bucket, limited to the clearbay/ prefix. Clearbay never creates, configures or lists buckets, so it needs no admin rights, and a leaked key could only reach that one folder.
Are my files encrypted in S3?
S3 encrypts all new objects at rest with SSE-S3 by default, and Clearbay sends everything over HTTPS. Clearbay doesn't add its own encryption before upload, so anyone with access to your AWS account and that bucket could read the archives. Keep the bucket private, protect your AWS root account with MFA, and use the restricted IAM user.
Sources
- Amazon S3 pricing (free 100 GB/month data transfer out, minimum durations and object sizes)
- AWS Price List API: Amazon S3, us-east-1 (storage, request and retrieval prices; publication 2026-11-09)
- AWS Price List API: Data Transfer, us-east-1 (internet egress tiers; publication 2026-11-11)
- Uploading and copying objects using multipart upload (billing for incomplete uploads, required permissions)
- Amazon S3 multipart upload limits
- Transitioning objects using Amazon S3 Lifecycle (128 KB default, archive restores)
- S3 API reference: Transition (30-day minimum before Standard-IA)