 Clearbay
Support
How to set up Clearbay, bring things back, connect cloud storage, and what to do when something doesn't work. Still stuck? Email us.
Getting started
- Connect your drive (optional). Any external drive you can write to works. You can also use cloud storage, see below.
- Open Clearbay and click Scan my Mac. Your Downloads folder works right away. To see more, Clearbay asks you to grant your Home folder (and, for apps, your Applications folder) with one click each. It remembers that choice.
- Pick a place in the sidebar: Big & old files, Downloads & installers, Developer & AI tools, Apps & leftovers, Photos & duplicates.
- Choose Remove, Keep or Offload for each item. Keep is the default. Not sure what something is? Click Explain, or press Space to preview it.
- Choose where offloads go in Drives & restore: click Use this drive next to your drive or bucket.
- Click Review & run, check the list, then click Run plan. Removed items go to the Trash. Offloaded items are copied, checked, and then removed from your Mac.
Folder access
Clearbay comes from the Mac App Store and runs in Apple's app sandbox. It never asks for Full Disk Access. Instead:
- Downloads works right away.
- Home folder: click Grant Home folder and choose your home folder in the standard macOS folder picker. This lets Clearbay measure big files, caches and developer folders.
- Applications: click Grant Applications to see which apps use the most space.
- Want to scan a drive or another folder? Choose it the same way.
Clearbay only reads names, sizes and dates to build its lists; it never opens your documents, and nothing leaves your Mac. To withdraw access, remove the folder in Clearbay's Settings.
Restore and undo
- Bring back an offloaded item: open Drives & restore and click Restore next to it. The drive (or internet connection, for cloud storage) must be available.
- Undo a whole run: Drives & restore → Undo last run puts everything from that run back where it was.
- Get back a removed item: removed items are in the Trash. Open the Trash in Finder, select the item and choose File → Put Back. Once you empty the Trash, they are gone.
- Drive not connected: Drives & restore shows which drive holds each offloaded item. Connect it, then restore.
- Cloud restores keep the copy in your bucket by default. Choose Restore & delete from cloud if you also want the cloud copy removed.
Every run is recorded in a journal on your Mac, which is what makes restore and undo possible.
Cloud storage setup
Clearbay can offload to S3-compatible storage with your own account and keys. Adding storage and testing the connection is free; offloading to it is part of Clearbay Pro.
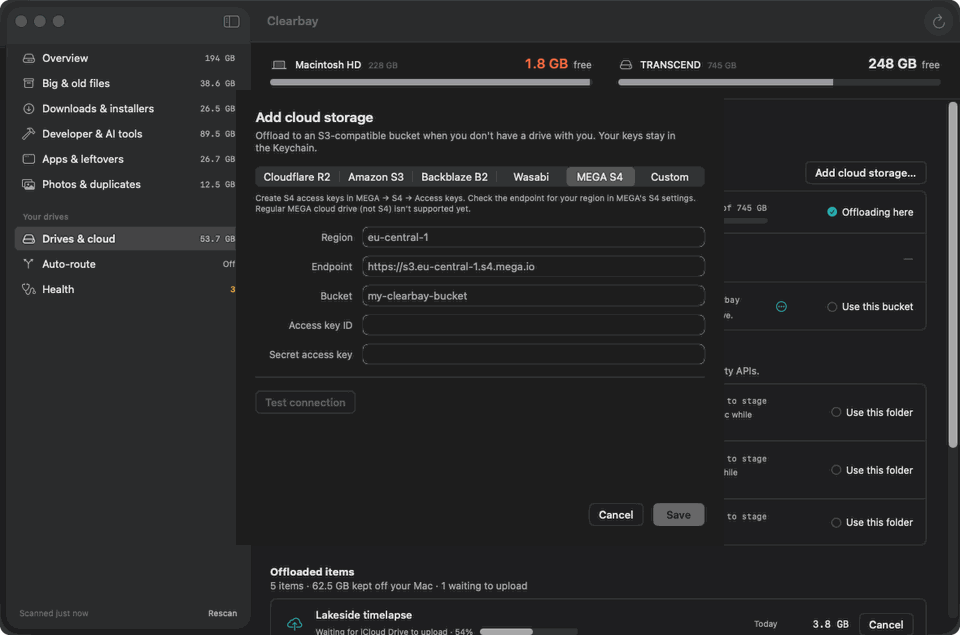
- Open Drives & cloud and click Add cloud storage…
- Pick a preset: Cloudflare R2, Amazon S3, Backblaze B2, Wasabi, MEGA S4 or Custom.
- Fill in the region or endpoint, the bucket name, the access key ID and the secret access key.
- Click Test connection, then Save, then Use this bucket.
Good to know
- Your keys are stored in your Mac's Keychain, on this Mac only. Files go straight from your Mac to your bucket; Clearbay's servers never see them.
- Items are uploaded as one archive per item, then checked against the bucket before the original is removed.
- Maximum size per item is 200 GB. An upload interrupted by a crash or shutdown is not resumed; the original stays on your Mac. Add a lifecycle rule that aborts incomplete multipart uploads after a day or two, so leftover parts don't cost you storage.
- Live tool caches (Gradle, Hugging Face, uv, Xcode DerivedData and similar) can't go to the cloud, because tools need to read them directly. Use a local drive for those.
- Storage and transfer costs are billed by your provider.
Cloudflare R2
- In the Cloudflare dashboard, open R2 Object Storage and create a bucket.
- Go to R2 → Manage API tokens → Create API token. Choose the permission Object Read & Write and limit it to your bucket.
- Copy the Access Key ID and Secret Access Key (the secret is shown only once) and your account's S3 endpoint,
https://<account-id>.r2.cloudflarestorage.com. - In Clearbay choose the Cloudflare R2 preset and paste them in. Region is
auto.
For the cleanup rule: bucket Settings → Object lifecycle rules, add a rule to abort incomplete multipart uploads.
Amazon S3
- Create a bucket in the region you want. Keep Block all public access on.
- In IAM, create a user (or role) for Clearbay with a policy limited to that bucket that allows
s3:ListBucket,s3:GetObject,s3:PutObject,s3:DeleteObjectands3:AbortMultipartUpload. - Create an access key for that user and copy the key ID and secret.
- In Clearbay choose Amazon S3, enter the bucket's region (for example
eu-central-1), the bucket name and the keys.
Add a lifecycle rule under the bucket's Management tab to delete incomplete multipart uploads.
Backblaze B2
- Create a private bucket and note its S3 endpoint (shown on the bucket, like
s3.us-west-004.backblazeb2.com). - Go to Application Keys → Add a New Application Key, allow access to that bucket only, with Read and Write.
- Copy the keyID (access key ID) and applicationKey (secret). The secret is shown only once.
- In Clearbay choose Backblaze B2 and enter the endpoint, bucket and keys.
Wasabi
- Create a bucket in a region and note its endpoint (like
s3.eu-central-1.wasabisys.com). - Under Access Keys, create a key. For safety, use a sub-user whose policy only allows that bucket.
- In Clearbay choose Wasabi and enter the region, bucket and keys.
Check Wasabi's minimum storage duration before offloading things you plan to restore soon.
MEGA S4
- In MEGA, enable S4 object storage, create a bucket, and create an access key for S4.
- In Clearbay choose MEGA S4. The endpoint is filled in as
https://s3.<region>.s4.mega.iowith regioneu-central-1; change the region if your bucket lives elsewhere. Path-style addressing is set for you. - Enter the bucket name and keys, then test.
Only MEGA S4 is supported. The regular MEGA cloud drive is not.
Custom (MinIO and others)
Choose Custom and enter the full endpoint URL, region, bucket and keys, then click Test connection.
Cloud folders: Google Drive, OneDrive, Dropbox, Box, iCloud Drive
Clearbay doesn't log in to these services. It uses the folder their own Mac app keeps in sync.
- Install the provider's app (for example Google Drive for desktop), sign in, and make sure its folder appears in Finder.
- In Clearbay, open Drives & cloud. Detected cloud folders are listed under Cloud folders; click Use this folder. In the App Store edition, click Choose cloud folder… and select it.
- Offload as usual. Clearbay copies each item into
Clearbay Offloadinside that folder and checks the copy. - Clearbay then waits until the provider's app reports the upload is finished. Only then is the original removed from your Mac, and Clearbay asks the provider to free its local copy. If a provider doesn't report upload status, Clearbay keeps the original until you confirm.
- Staging needs room on your Mac: the item's size plus 2 GB free.
- Items waiting for upload are remembered and continue the next time Clearbay opens. Keep the provider's app running and signed in.
- iCloud Drive can be used as a destination only. Clearbay never scans or removes anything already in iCloud Drive.
- Cloud folder offload is part of Clearbay Pro.
Bought Clearbay Pro on clearbay.app
Clearbay Pro is a one-time purchase. If you bought it on this website (rather than inside the Mac App Store app), here's how to use it.
Unlock Pro on this Mac
- Install Clearbay from the Mac App Store.
- Click Open Clearbay on the thank-you page after payment, or in your receipt email from [email protected]. Pro unlocks in the app in one click.
Until Clearbay is available on the Mac App Store, your purchase is a pre-order: you can unlock Pro as soon as you install the app. The Open Clearbay button works for 30 days; after that, use Sign in below.
Use Pro on another Mac
- Open Clearbay and choose Upgrade → Sign in.
- Enter the email address you bought with.
- Enter the 6-digit code we email you.
One purchase works on up to 3 Macs at a time. To move Pro to a different Mac, open Settings → Sign out of this Mac on a Mac you no longer use; that frees its slot.
The email didn't arrive
- Check your spam or junk folder.
- Wait a minute; emails can take a little while.
- Still nothing? Request a new code in Clearbay. Codes expire after 15 minutes, so always use the newest one.
- Make sure you entered the same email address you used at checkout. If it still doesn't work, email us with your purchase email.
Refunds
Purchases on clearbay.app can be refunded in full within 30 days, no questions asked. See the Refund Policy.
Troubleshooting
Some folders or caches don't show up
Grant the folder that contains them, usually your Home folder (see Folder access). Caches inside other apps' private containers can't be reached from the Mac App Store sandbox. Some locations are never shown on purpose: system folders, Keychains, Mail, Messages, the Photos library, iCloud Drive's storage, .git folders and projects changed in the last 7 days.
An offload failed
Your original wasn't touched; Clearbay only removes it after the copy is checked. Check that the drive is still connected and has enough free space, then run the plan again.
A tool re-downloads its cache after offloading
That's expected: tools like Gradle, npm and uv rebuild their caches on their own. If you'd rather not wait, restore the offloaded copy from Drives & restore.
Explain shows "From built-in rules"
AI explanations need Apple Intelligence (macOS 26 or later on a supported Mac) turned on in System Settings, and AI turned on in Clearbay's Settings. Without it, built-in rules still give a short explanation and the safety label.
Cloud "Test connection" fails
Check the endpoint and region, that the bucket name is exact, that the key has read and write permission for that bucket, and that your Mac's date and time are set automatically.
A cloud folder item stays "Waiting for upload"
Make sure the provider's app is running, signed in, not paused, and has room in your cloud account. Clearbay continues on its own once the upload finishes.
Uninstalling Clearbay
- If you want offloaded items back on your Mac, restore them first.
- Quit Clearbay and drag it from Applications to the Trash.
- To remove its data too, delete
~/Library/Application Support/Offload. Offloaded items on your drive or bucket stay where they are.
Contact
Email[email protected]. It helps to include your macOS version, the Clearbay version, and what you expected to happen. Please don't send file contents; names and sizes are enough.
Clearbay is made by NepTechPal, an independent developer in Nepal. We read every message.
Refunds for App Store purchases are handled by Apple at reportaproblem.apple.com. For purchases on clearbay.app, see our Refund Policy.